
StreamPort
DocumentationDownload PDF

Quick Start
Guide

From download to live on every platform in about ten minutes. Works on any Mac with macOS 12 or later, Apple Silicon or Intel.
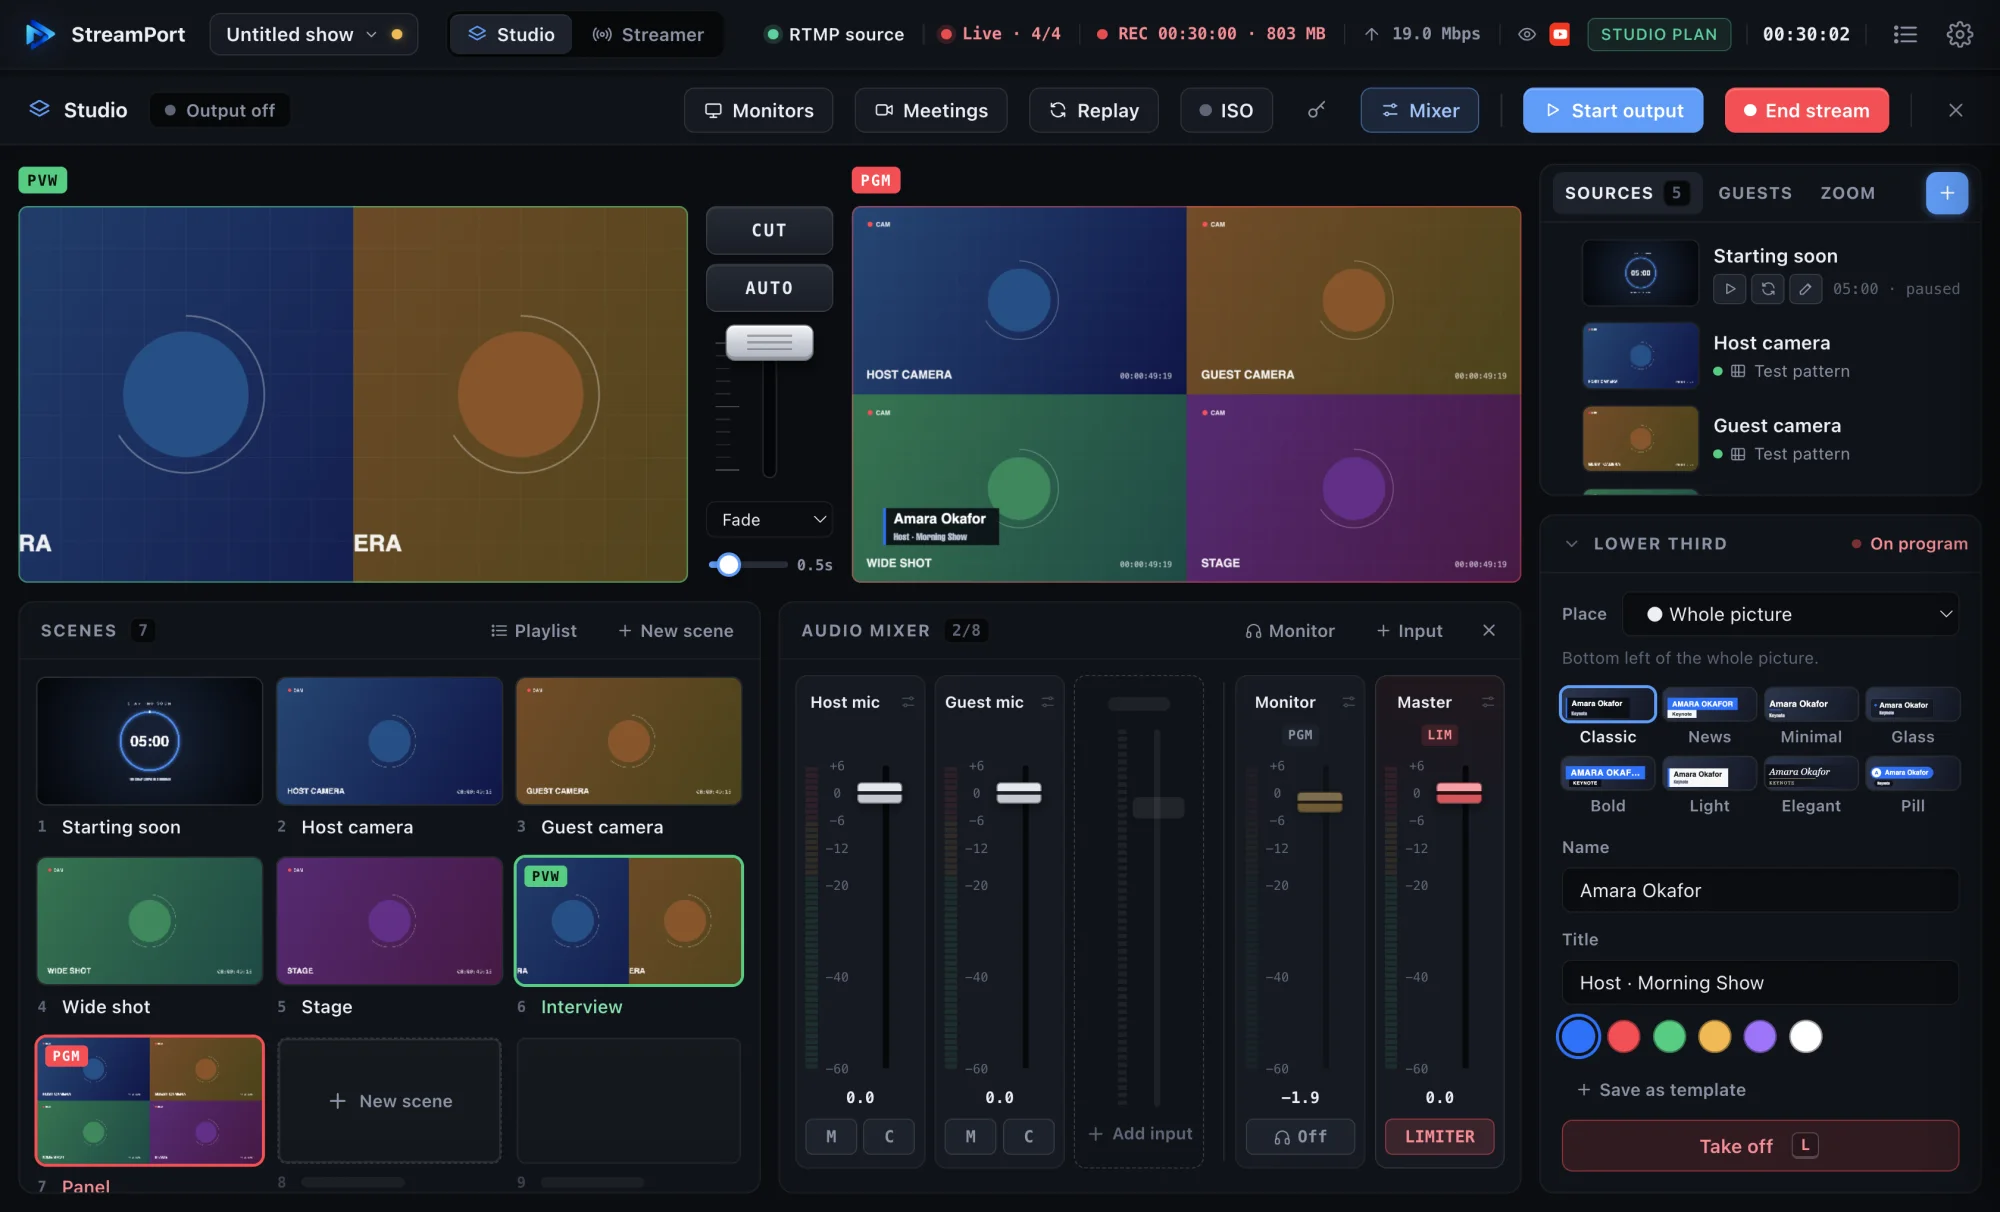
The StreamPort Studio
1Install StreamPort
5Add your destinations
2Activate your licence
6Go live
3Allow camera and mic
7Bring on guests and Zoom
4Build your show
8Send your show to meetings
streamport.appVersion 1.0
Getting set up

Install, activate, allow

1

Install StreamPort

  1. Download StreamPort from streamport.app/download.
  2. Open the downloaded .dmg file and drag StreamPort into Applications.
  3. Open StreamPort from Applications or Launchpad. A short setup guide appears the first time.

Every new copy includes a 14-day free trial with every feature. No card needed.

2

Activate your licence

After you buy, there is no key to copy and no password to remember:

  1. Open Settings → License (the gear at the top right).
  2. Type the email address you used to buy and press Email me a code.
  3. Enter the 6-digit code from your email. You’re activated.
Prefer a key? Paste the licence key from your receipt email into the same screen. One licence works on 2 Macs. To move it, sign out on one Mac in Settings → License.
3

Allow camera, microphone and notifications

macOS asks before any app can use your camera or microphone. When StreamPort asks, choose Allow so nothing interrupts you during a show.

  • Missed it? Open System Settings → Privacy & Security → Camera (and Microphone) and switch StreamPort on.
  • For NDI sources, macOS also asks for Local Network access the first time you scan. Choose Allow.
StreamPort Quick Start2
The Studio

Build your show

The Studio with Preview, Program, scenes and the audio mixer
Preview on the left, Program (what viewers see) on the right, scenes and the mixer underneath.
4

Sources, scenes, Preview and Take

  1. Press Add source to add cameras, your screen, videos, images, guests or a test pattern.
  2. Press Add scene and pick a layout (full screen, side by side, picture-in-picture, grid). New scenes always open in Preview, never straight on air.
  3. When Preview looks right, press Take for a smooth transition or Cut for an instant switch.
  4. Graphics work the same way: cue a lower third, banner, ticker, countdown or logo, check it, then press Take.

Every microphone and guest gets its own channel in the Audio mixer, with meters, mute and a limiter on the master.

StreamPort Quick Start3
Going live

Stream everywhere at once

5

Add your destinations

  1. Open Settings → Destinations → Add destination.
  2. Pick the platform: YouTube, Facebook, Twitch, Kick, TikTok, Instagram, LinkedIn, X or any custom RTMP server.
  3. Paste the stream key from that platform’s live dashboard. Keys are kept in your Mac’s keychain.

On the Studio plan you can also connect your YouTube, Facebook and Twitch accounts, so titles, broadcasts, chat and viewer counts are handled for you.

6

Go live

  1. Press Go Live. The pre-flight check confirms your picture, sound and upload speed and lets you choose which destinations to start.
  2. Each destination shows its own bitrate, frames, dropped frames and viewers. If one drops, StreamPort reconnects it on its own.
  3. Switch the monitor to Stats for live graphs of your encoder, upload, audio levels, CPU, memory and disk.
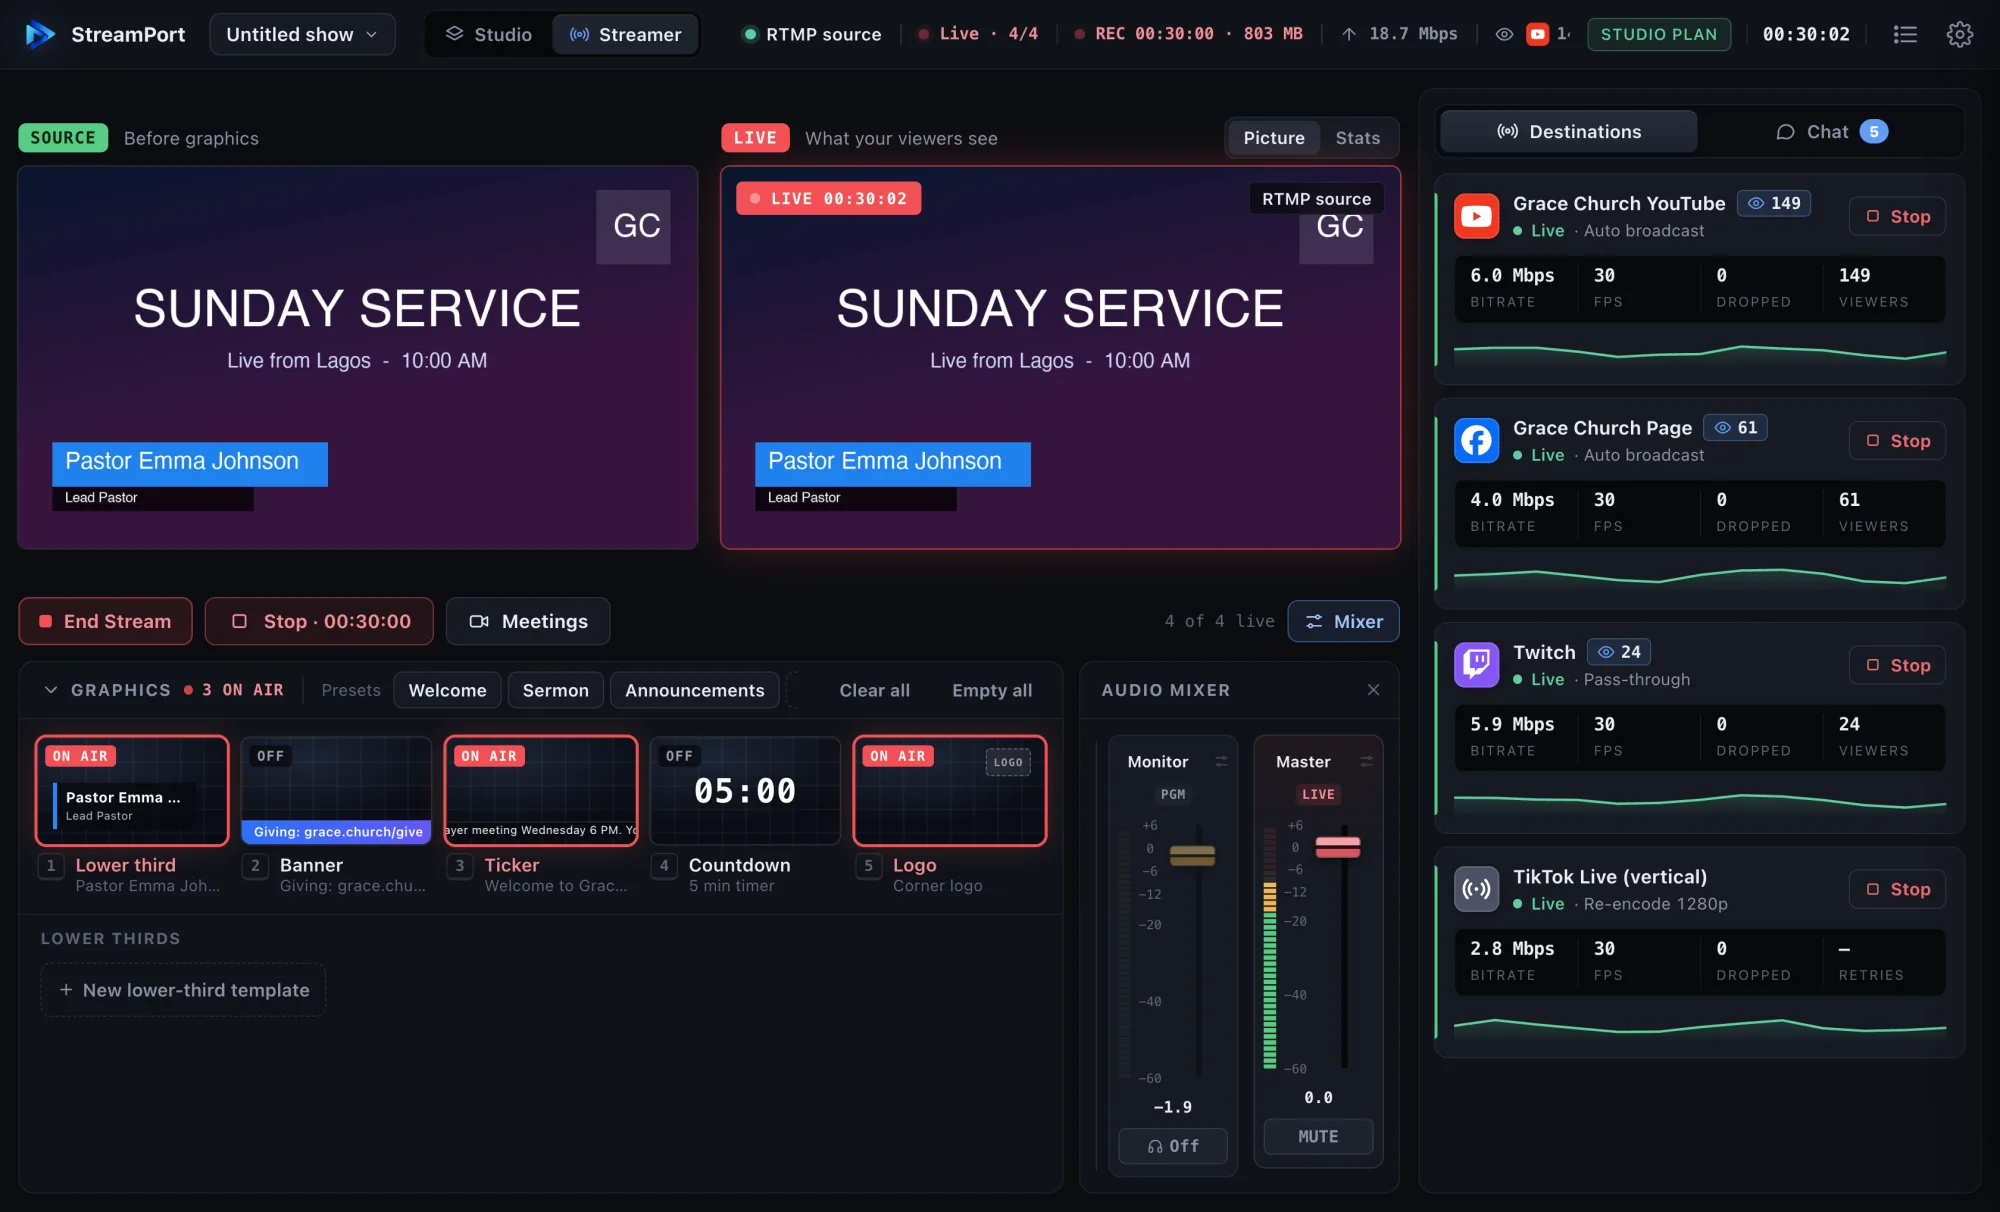
The Streamer with four destinations live
Four destinations live, each with its own health readout.
StreamPort Quick Start4
People and meetings

Guests, Zoom and meetings

7

Bring on guests and Zoom callers

  • Browser guests: open the Guests tab in the Studio, open a guest room and send the link. Guests join from Chrome, Safari, Edge or Firefox on a computer or phone, with no app or account. You admit them, then put them in any scene. Solo includes 2 guests, Studio 4.
  • Zoom participants (Studio plan): join a Zoom meeting from the Studio and every participant becomes their own source. The Zoom host clicks Grant permission when Zoom asks about livestreaming.
8

Send your show to Zoom, Teams and Meet

  1. In the Studio, press Meetings, then Send my show to meetings.
  2. The first time, macOS asks you to allow the camera: open System Settings → General → Login Items & Extensions → Camera Extensions and switch StreamPort on. The virtual mic asks for your Mac password once. If StreamPort asks you to restart your Mac, do that.
  3. In Zoom, Teams or Meet, choose camera StreamPort Virtual Camera and microphone StreamPort Virtual Mic.

Meetings get your finished program in 1080p, graphics and sound included. The virtual camera and mic are part of the Studio plan.

Handy shortcuts

SpaceTake every graphic off air

Hover any button to see its shortcut, or press the key icon in the Studio toolbar for the full list and Stream Deck setup.

Need help?

  • Guides: streamport.app/docs
  • Your plan and Macs: streamport.app/account
  • Email: support@streamport.app
StreamPort is sold by Trini Web Solution · streamport.app5